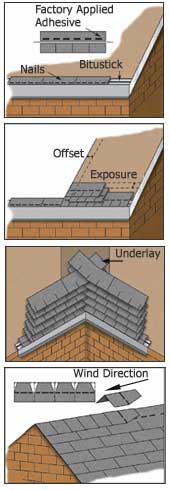
Installation
Installation starts by marking out the vertical centre line of the roof, with another line running parallel to show the offset of alternate courses, and horizontal lines showing the exposure
distance between the courses. The offset and exposure distances are both shown in the data table overleaf.
Laying the tiles commences at the eaves with a starter course, which is made by cutting the tabs off the tile strip. This is positioned on the offset line, sealed underneath with Bitustick
adhesive and nailed to the deck above the heat sensitive adhesive. The first course is nailed on top of this starting from the centre line, with the nails above the adhesive and going
through two layers of tiles, and the strips butted end to end along the roof. The second and alternate courses are placed on the offset line and worked up towards the ridge. The final course is
bent over the ridge, bearing in mind the direction of the prevailing winds.
Tegola tiles are supplied with factory applied heat sensitive adhesive, which soften with heat in the roof and stick the courses together, to prevent wind up-lift. After laying the roof,
the leading edges of the tiles are lifted and the adhesive is heated with a roofing torch and bedded down on the courses above. Nails should never be placed into the adhesive otherwise the
courses will not stick together.
The ridge, and any hips, are then capped by tiles produced by cutting through the notches on the strips, nailed into position with 2 nails either side and Bitustick adhesive applied over the
nails to prevent water penetration and assist in sticking down the overlapping ridge tiles. Installation must be carried out in the opposite direction to the prevailing winds to prevent wind
driven rain from penetrating the ridge caps.
Valleys are started with the Tegola tourch-on or self adhesive underlay down the centre line and then interweaving the courses of tiles from the two intersecting roof pitches. For shorter
valleys, where the water flow is smaller, it is neater to extend the tiles from one side 1 tab width beyond the centre line and then are cut from the other side to the centre line. This gives a neat
mitred effect but relies on a good quality underlay for waterproofing.
Eaves and verges are best formed by metal or plastic trims with Bitustick adhesive preventing water penetration between the trim and the tile. However, wooden barge boards are sometimes used
at verges with a capping piece covering 75mm of the tile underneath and bedded down on to Bitustick. At the eaves the starter course can project over the top of the gutter, if
it is sufficiently close, or in the absence of the gutter be nailed against the vertical face of eaves board.
Ventilation of the roof void is an important way of reducing condensation. Ventilators are available, which are usually placed at the top of the slope near the ridge to act as ventilation
outlets, with the ventilation inlet being placed below the eaves. A vented ridge construction is also available. |